Burning the Bootloader without external AVR-Writer

-- CUI Operation --
Kimio Kosaka


2008.07.27 05:48(JST)


When we burn the bootloader of Arduino Diecimila, we connected external AVR-Writer to ICSP of Diecimila.

But I found the method to burn the bootloader by Diecimila itself without external AVR-writer. It is able to do by FT232RL BitBang Mode AVR-Writer software.

And, this method is usable in ArduinoNG, Arduino Duemilanove and w/ATMega328P too.


Japanese    English


  1. FT232RL BitBang Mode AVR-Writer

    FT232RL is an USB-Serial bridge on an Arduino Dicimila/NG/Duemilanove PCB. It has the function to manipulate each signal pin directly. It's called BitBang Mode.

    "avrdude-serjtag" is AVR-Writer software developed by Mr.Suz. It include the function to control FT232RL BitBang Mode.

    If we use "avrdude-serjtag" we can burn the bootloader by Diecimila itself.

    I describe below the method. on Windows-XP.


  2. Modify the Dicimila

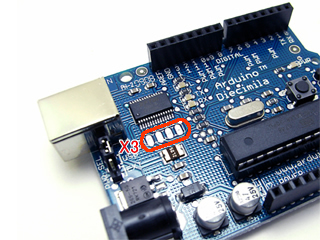
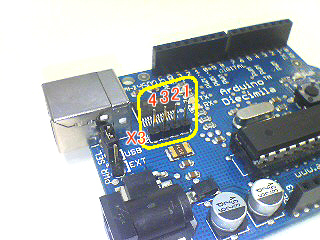
    There are four pads written as X3 near FT232RL on a Diecimila PCB. (These pads are connected to the control pins of FT232RL.)
    Remove the solder of these pads and insert a pin-header. And soldering it.


    diecimila_befor_1      diecimila_after_1


  3. Installing avrdude-serjtag

    Download serjtag-0.3 and extract it.

    serjtag-0.3.zip mirror site

    serjtag-0.3.tar.gz mirror site

    serjtag-0.3.zip original site (http://suz-avr.sblo.jp/article/4438871.html)

    serjtag-0.3.tar.gz original site (http://suz-avr.sblo.jp/article/4438871.html)


  4. Configure avrdude-serjtag

    Insert the script as follows in programmer section of serjtag-0.3\avrdude-serjtag\binary\avrdude.conf.

    #arduino diecimila
    programmer
      id="diecimila";
      desc = "FT232R Synchronous BitBang";
      type = ft245r;
      miso = 3;  # CTS X3(1)
      sck = 5;  # DSR X3(2)
      mosi = 6;  # DCD X3(3)
      reset = 7;  # RI X3(4)
    ;

  5. Testing
    • Wiring

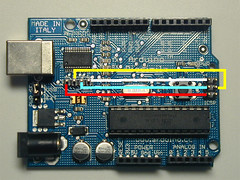
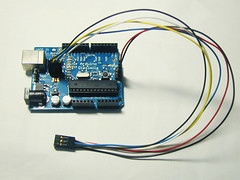
      Connect the pins of X3 and the pins of ICSP by wires. Please see the photograph below. (click to enlarge)

      connecting    connecting_p


    • Connect Diecimila and a PC by a USB cable.
    • Starting avrdude-serjtag
      Start "Command Prompt" of Windows and operate as follows.
      Change current directory.
      C:\Documents and Settings\admin>cd C:\serjtag-0.3\avrdude-serjtag\binary
      Start avrdude-serjtag with slow clock mode.
      C:\serjtag-0.3\avrdude-serjtag\binary>avrdude -c diecimila -P ft0 -p m168 -t -B 4800
      avrdude: BitBang OK
      avrdude: pin assign miso 3 sck 5 mosi 6 reset 7
      avrdude: drain OK
        ft245r: bitclk 4800 -> ft baud 2400
      avrdude: AVR device initialized and ready to accept instructions
      Reading | ################################################## | 100% 0.00s
      avrdude: Device signature = 0x1e9406
      Return value 0x1e9406 is device signature code of ATmega168
      Quit avrdude-serjtag
      avrdude> quit
      >>>quit
      avrdude: safemode: Fuses OK

      avrdude done. Thank you.

      C:\serjtag-0.3\avrdude-serjtag\binary>

      When do not work, it is displayed as follows.
      C:\serjtag-0.3\avrdude-serjtag\binary>avrdude -c diecimila -P ft0 -p m168 -t -B 4800
      avrdude: BitBang OK
      avrdude: pin assign miso 3 sck 5 mosi 6 reset 7
      avrdude: drain OK
        ft245r: bitclk 4800 -> ft baud 2400
      avrdude: ft245r_program_enable: failed
      avrdude: initialization failed, rc=-1
                  Double check connections and try again, or use -F to override
                  this check.

      avrdude done. Thank you.

      C:\serjtag-0.3\avrdude-serjtag\binary>

      Start avrdude-serjtag with fast clock mode.
      C:\serjtag-0.3\avrdude-serjtag\binary>avrdude -c diecimila -P ft0 -p m168 -t
      avrdude: BitBang OK
      avrdude: pin assign miso 3 sck 5 mosi 6 reset 7
      avrdude: drain OK
        ft245r: bitclk 230400 -> ft baud 115200
      avrdude: AVR device initialized and ready to accept instructions
      Reading | ################################################## | 100% 0.00s
      avrdude: Device signature = 0x1e9406
      avrdude> quit
      >>>quit
      avrdude: safemode: Fuses OK

      avrdude done. Thank you.

      C:\serjtag-0.3\avrdude-serjtag\binary>

  6. Burning the Bootloader
    • Reading Fuse-Bits
      Read fuse-bits of ATmega168 and memorize or copy it.
      C:\serjtag-0.3\avrdude-serjtag\binary>avrdude -c diecimila -P ft0 -p m168 -t
      avrdude: BitBang OK
      avrdude: pin assign miso 3 sck 5 mosi 6 reset 7
      avrdude: drain OK
        ft245r: bitclk 230400 -> ft baud 115200
      avrdude: AVR device initialized and ready to accept instructions
      Reading | ################################################## | 100% 0.00s
      avrdude: Device signature = 0x1e9406
      avrdude> d efuse
      >>> d efuse
      0000  00

      avrdude> d hfuse
      >>> d hfuse
      0000  dd

      avrdude> d lfuse
      >>> d lfuse
      0000  ff

      avrdude> d lock
      >>> d lock
      0000  0f

      avrdude> quit
      >>>quit
      avrdude: safemode: Fuses OK

      avrdude done. Thank you.

      C:\serjtag-0.3\avrdude-serjtag\binary>

    • Copying bootloader
      Copy ATmegaBOOT_168_diecimila.hex of "arduino-0011\hardware\bootloaders\atmega168\" to folder of "serjtag-0.3\avrdude-serjtag\binary\".

    • Insert new chip

      - Disconnect a USB cable from Diecimila.

      - Remove ATmega168-chip from Diecimila

      - Insert new ATmega168-chip

      - Connect a USB cable to Diecimila again.


    • Writing Fuse-Bits without Lock-Bit
      Start arvedude-serjtag with slow clock mode. And write fuse-bits.
      Attention !!! New chip cannot run by fast clock mode.
      C:\serjtag-0.3\avrdude-serjtag\binary>avrdude -c diecimila -P ft0 -p m168 -t -B 4800
      avrdude: BitBang OK
      avrdude: pin assign miso 3 sck 5 mosi 6 reset 7
      avrdude: drain OK
        ft245r: bitclk 4800 -> ft baud 2400
      avrdude: AVR device initialized and ready to accept instructions
      Reading | ################################################## | 100% 0.00s
      avrdude: Device signature = 0x1e9406
      Erase chip
      avrdude> erase
      >>> erase
      avrdude: erasing chip
      ft245r: bitclk 4800 -> ft baud 2400
      Write fuse-bits
      avrdude> w efuse 0 0x00
      >>> w efuse 0 0x00

      avrdude> w hfuse 0 0xdd
      >>> w hfuse 0 0xdd

      avrdude> w lfuse 0 0xff
      >>> w lfuse 0 0xff

      avrdude> quit

      Check whether it work with a fast clock mode.
      C:\serjtag-0.3\avrdude-serjtag\binary>avrdude -c diecimila -P ft0 -p m168 -t
      avrdude: BitBang OK
      avrdude: pin assign miso 3 sck 5 mosi 6 reset 7
      avrdude: drain OK
        ft245r: bitclk 230400 -> ft baud 115200
      avrdude: AVR device initialized and ready to accept instructions
      Reading | ################################################## | 100% 0.00s
      avrdude: Device signature = 0x1e9406
      avrdude> quit

      Burn the bootloader by command line mode ( without -t option )
      C:\**\binary> avrdude -c diecimila -P ft0 -p m168 -U flash:w:ATmegaBOOT_168_diecimila.hex
      avrdude: BitBang OK
      avrdude: pin assign miso 3 sck 5 mosi 6 reset 7
      avrdude: drain OK
        ft245r: bitclk 230400 -> ft baud 115200
      avrdude: AVR device initialized and ready to accept instructions
      Reading | ################################################## | 100% 0.00s
      avrdude: Device signature = 0x1e9406
      avrdude: NOTE: FLASH memory has been specified, an erase cycle will be performed
                  To disable this feature, specify the -D option.
      avrdude: erasing chip
      ft245r: bitclk 230400 -> ft baud 115200
      avrdude: reading input file "ATmegaBOOT_168_diecimila.hex"
      avrdude: input file ATmegaBOOT_168_diecimila.hex auto detected as Intel Hex
      avrdude: writing flash (16154 bytes):

      Writing | ################################################## | 100% 8.75s

      avrdude: 16154 bytes of flash written
      avrdude: verifying flash memory against ATmegaBOOT_168_diecimila.hex:
      avrdude: load data flash data from input file ATmegaBOOT_168_diecimila.hex:
      avrdude: input file ATmegaBOOT_168_diecimila.hex auto detected as Intel Hex
      avrdude: input file ATmegaBOOT_168_diecimila.hex contains 16154 bytes
      avrdude: reading on-chip flash data:

      Reading | ################################################## | 100% 4.05s

      avrdude: verifying ...
      avrdude: 16154 bytes of flash verified
      avrdude: safemode: Fuses OK

      avrdude done. Thank you.

      C:\serjtag-0.3\avrdude-serjtag\binary>

      Writing Lock-Bit
      C:\serjtag-0.3\avrdude-serjtag\binary>avrdude -c diecimila -P ft0 -p m168 -t
      avrdude: BitBang OK
      avrdude: pin assign miso 3 sck 5 mosi 6 reset 7
      avrdude: drain OK
        ft245r: bitclk 230400 -> ft baud 115200
      avrdude: AVR device initialized and ready to accept instructions
      Reading | ################################################## | 100% 0.00s
      avrdude: Device signature = 0x1e9406
      avrdude> w lock 0 0x0f
      >>> w lock 0 0x0f

      avrdude> quit

      With the above burning of the bootloader is the end.

    • If you want to burn the bootloader onto .....
      • ATmega8 [Click here]
      • ATmega328P [Click here]

    • Confirming

      - Disconnect a USB cable from Diecimila.

      - Remove the wires of ICSP and X3.

      - Connect a USB cable to Diecimila again.

      - Push the reset button of Diecimila.

      - Start Arudino-IDE

      - Upload sample sketch "Blink".

      And it will be run.


  7. Demo-Video


  8. Dicimila become AVR-Writer

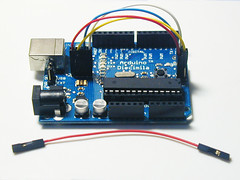
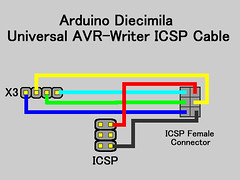
    We can use Dicimila as an universal AVR-Writer if we use avrdude-serjtag and the ICSP cable such as the photograph below. (click to enlarge)

    avr_writer    icsp-cable


Thanks

Very thanks Mr.Suz who developed BitBang Mode AVR-Writer software "avrdude-serjtag".


update 2009.03.19 about ATmega328P

upload 2008.07.27 05:48(JST)

update 2008.08.01


[Return]        


[Another Hack] Arduino meets Processing via WiFi. How to make cheap WiFi environment for Arduino by FON's router.

Creative Commons License